← Go back
Scroll to top with progress - CSS + JavaScript Tutorial
Posted on March 31, 2023 at 11:05 (GMT +00:00) by Colin
Recently I have been helping my wife teach her students web design and development, so I plan to begin making and writing some very simple tutorials and demonstrations.
Since I am making these I thought it may be useful to others, and while there are probably some similar things on the web (pretty much anything that can be made will probably already exist somewhere) - I wanted to share it anyway!
I am assuming you already have some knowledge of HTML, CSS and some basic understanding of JavaScript.
Let's begin by adding to our HTML a div which will be used as our button and giving it a class name.
We need to style our button using some CSS using the following properties (see comments for info)
Next we need a character or image to let the user get an idea what this button is for. I decided to use an svg, so a quick google search for "svg chevron up" and I quickly found this:
Let's update our b2t_button on our HTML to include the svg:
Now if you check your site, your button will not be showing, this is because we set display as none, since we don't want it always showing. Let's fix that now using some JavaScript.
You can either add your JS to an external file or include it inline just above your ending body tag.
First we will add a variable which references our button for later access.
Next we need to show the button when the page is scrolling. To do this we will use the window.onscroll event (see comments for basic explanation):
Now if you have followed closely and everything is correct, you should see something similar when you scroll your page:
Next we need the button to actually work! Let's add some more JS to move the page. We will create another function called moveTo with a single offset parameter.
Then inside your html, your b2t_btn we will add an onclick event to call our moveTo function
Check the result, now if you click your button the page will move to the top. We can also use a relatively new css property which sets the scroll behaviour of the browser. This should be added to your html element. Append to or add the following to your stylesheet:
This will tell the browser we want a smooth scrolling functionality. Let's also add a hover event to our button in our css.
Excellent! Now your button is complete we will extend it further and add a scroll position indicator/progress.
First we will add a custom property to our button with following css:
We must also update our scroll event function to update the custom property.. add this to the event of the event function:
Let's also move the event function code into it's own function and call it from the event function like so:
Now to add the progress indicator we will be using 2 css gradient functions: radial-gradient and conic-gradient. These 2 functions need their own whole tutorial so after you finish this, I suggest you head off to mozilla's website to read up on those 2 functions and then try to modify your code so you better understand them.
Inside your button css class we will add the background gradients like so:
The radial gradient hides part of the conic gradient so we can make it look like a circular progress indicator. The conic gradient is using the custom css property we added earlier, which is updated in our js code inside the scroll event function.
We can also add to the bottom of our hover css to make any needed changes:
Save and test, if you have completed everything correctly you will see something similar to the following image:
That pretty much wraps it up for this basic tutorial. If you questions or would like to request other tutorials, drop me a comment!
The code for this tutorial:
HTML:
CSS:
JavaScript:
Since I am making these I thought it may be useful to others, and while there are probably some similar things on the web (pretty much anything that can be made will probably already exist somewhere) - I wanted to share it anyway!
I am assuming you already have some knowledge of HTML, CSS and some basic understanding of JavaScript.
Let's begin by adding to our HTML a div which will be used as our button and giving it a class name.
<body>
		<div class="b2t_btn" title="Go to top">
		</div>

	// ... rest of your HTML here
We need to style our button using some CSS using the following properties (see comments for info)
/* our back 2 top button class */
.b2t_btn {
	/* we will use flex to position anything inside the button to the centre, but for now everything is hidden */
	display:none;

	/* vertically align content to centre */
	align-items:center;

	/* horizontal align content to centre */
	justify-content:center;

	/* set width and height of the button, we don't want this too big or small */
	/* you could change this to relative sizes using em if you wish, e.g. 3em */
	width:48px;
	height:48px;

	/* the position of the element will be fixed position */
	position:fixed;

	/* this will act like a margin 30px from the bottom right edge */
	bottom:30px;
	right:30px;

	/* keep this element above other elements rendered on page, increase this if required */
	z-index:99;

	/* make our button round */
	border-radius:50%;

	/* add a solid white line border, make it pop on darker backgrounds */
	border: solid 1px #fff;

	/* foreground colour will be white */
	color:white;

	/* set cursor when hovering over our button */
	cursor:pointer;
}
Next we need a character or image to let the user get an idea what this button is for. I decided to use an svg, so a quick google search for "svg chevron up" and I quickly found this:
<!-- svg credit to getbootstrap.com -->
<svg xmlns="http://www.w3.org/2000/svg" width="16" height="16" fill="currentColor" viewBox="0 0 16 16">
	<path fill-rule="evenodd" d="M7.646 4.646a.5.5 0 0 1 .708 0l6 6a.5.5 0 0 1-.708.708L8 5.707l-5.646 5.647a.5.5 0 0 1-.708-.708l6-6z"/>
</svg>
Let's update our b2t_button on our HTML to include the svg:
<body>
		<div class="b2t_btn" title="Go to top">
			<svg xmlns="http://www.w3.org/2000/svg" width="24" height="24" fill="currentColor" viewBox="0 0 16 16">
				<path fill-rule="evenodd" d="M7.646 4.646a.5.5 0 0 1 .708 0l6 6a.5.5 0 0 1-.708.708L8 5.707l-5.646 5.647a.5.5 0 0 1-.708-.708l6-6z"/>
			</svg>
		</div>

	// ... rest of your HTML here
Now if you check your site, your button will not be showing, this is because we set display as none, since we don't want it always showing. Let's fix that now using some JavaScript.
You can either add your JS to an external file or include it inline just above your ending body tag.
First we will add a variable which references our button for later access.
var b2t = document.querySelector('.b2t_btn');Next we need to show the button when the page is scrolling. To do this we will use the window.onscroll event (see comments for basic explanation):
window.onscroll = function() {
// get our current scroll offset
var currentScroll = document.documentElement.scrollTop;
// only show our b2t button if scroll offset is above 10
if (currentScroll > 10) {
b2t.style.display = "flex"; // remember we are using flex
} else {
b2t.style.display = "none";
}
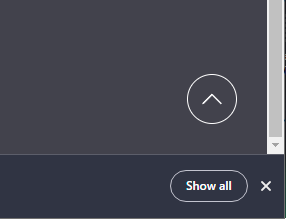
};Now if you have followed closely and everything is correct, you should see something similar when you scroll your page:

Next we need the button to actually work! Let's add some more JS to move the page. We will create another function called moveTo with a single offset parameter.
// very simple function to move document to "pos" position.
function moveTo(pos) {
	// this updates the scroll offset and sets it as pos
	document.documentElement.scrollTop = pos;
}
Then inside your html, your b2t_btn we will add an onclick event to call our moveTo function
<body>
		<div onclick="moveTo(0)" class="b2t_btn" title="Go to top">

	// ....
Check the result, now if you click your button the page will move to the top. We can also use a relatively new css property which sets the scroll behaviour of the browser. This should be added to your html element. Append to or add the following to your stylesheet:
html { scroll-behavior:smooth; }This will tell the browser we want a smooth scrolling functionality. Let's also add a hover event to our button in our css.
.b2t_btn:hover {
	/* change foreground colour */
	color:#ddb357;
}
Excellent! Now your button is complete we will extend it further and add a scroll position indicator/progress.
First we will add a custom property to our button with following css:
.b2t_btn {
	/* this will be used to change the progress of our indicator */
	--b2t_progress:0%;

	/* rest of our css */
We must also update our scroll event function to update the custom property.. add this to the event of the event function:
// get the relative height
var height = document.documentElement.scrollHeight - document.documentElement.clientHeight;

// convert scoll offset into a percentage
var scrolled = (currentScroll / height) * 100;

// update our custom progress property/variable
b2t.style.setProperty('--b2t_progress', scrolled + '%');
Let's also move the event function code into it's own function and call it from the event function like so:
window.onscroll = function() { pageScrollEvent() };Now to add the progress indicator we will be using 2 css gradient functions: radial-gradient and conic-gradient. These 2 functions need their own whole tutorial so after you finish this, I suggest you head off to mozilla's website to read up on those 2 functions and then try to modify your code so you better understand them.
Inside your button css class we will add the background gradients like so:
background:
	radial-gradient(closest-side, #504b40 90%, transparent 90% 100%),
	conic-gradient(#ddb357 var(--b2t_progress), rgba(0,255,0,.2) 0%);
The radial gradient hides part of the conic gradient so we can make it look like a circular progress indicator. The conic gradient is using the custom css property we added earlier, which is updated in our js code inside the scroll event function.
We can also add to the bottom of our hover css to make any needed changes:
/* change background gradients */
background:
radial-gradient(closest-side, #5c5035 90%, transparent 90% 100%),
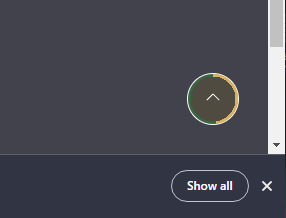
conic-gradient(#ddb357 var(--b2t_progress), rgba(0,255,0,.2) 0%);Save and test, if you have completed everything correctly you will see something similar to the following image:

That pretty much wraps it up for this basic tutorial. If you questions or would like to request other tutorials, drop me a comment!
The code for this tutorial:
HTML:
<!doctype html>
<html lang="en">
	<head>
		<meta charset="utf-8">
		<title>Scroll to top with progress - CSS + JavaScript Tutorial</title>
		<meta name="author" content="Colin J.D. Stewart">

		<link rel="stylesheet" href="css/default.css">
	</head>

	<body>
		<div onclick="moveTo(0)" class="b2t_btn" title="Go to top">
			<!-- svg credit to getbootstrap.com -->
			<svg xmlns="http://www.w3.org/2000/svg" width="24" height="24" fill="currentColor" viewBox="0 0 16 16">
				<path fill-rule="evenodd" d="M7.646 4.646a.5.5 0 0 1 .708 0l6 6a.5.5 0 0 1-.708.708L8 5.707l-5.646 5.647a.5.5 0 0 1-.708-.708l6-6z"/>
			</svg>
		</div>

		<!-- page content here -->

		<script src="js/b2t-tutorial.js"></script>
	</body>
</html>
CSS:
html { scroll-behavior:smooth; }

/* our back 2 top button class */
.b2t_btn {
	/* this will be used to change the progress of our indicator */
	--b2t_progress:0%;

	/* we will use flex for position anything inside the button to the centre, but for now it is hidden */
	display:none;

	/* vertically align content to centre */
	align-items:center;

	/* horizontal align content to centre */
	justify-content:center;

	/* set width and height of the button, we don't want this too big or small */
	/* you could change this to relative sizes using em if you wish, e.g. 3em */
	width:48px;
	height:48px;

	/* the position of the element will be fixed position */
	position:fixed;

	/* this will act like a margin 30px from the bottom right edge */
	bottom:30px;
	right:30px;

	/* keep this element above other elements rendered on page, increase this if required */
	z-index:99;

	/* make our button round */
	border-radius:50%;

	/* add a solid white line border, make it pop on darker backgrounds */
	border: solid 1px #fff;

	/* foreground colour will be white */
	color:white;

	/* set cursor when hovering over our button */
	cursor:pointer;

	/*
		the background uses 2 gradient functions, this is too complex to explain in this tutorial,
		but mozilla have a great resource on this: https://developer.mozilla.org/en-US/docs/Web/CSS/gradient/conic-gradient
	*/
	background:
		radial-gradient(closest-side, #504b40 90%, transparent 90% 100%),
		conic-gradient(#ddb357 var(--b2t_progress), rgba(0,255,0,.2) 0%);
}

/* on hover */
.b2t_btn:hover {
	/* change foreground colour */
	color:#ddb357;

	/* change background gradients */
	background:
		radial-gradient(closest-side, #5c5035 90%, transparent 90% 100%),
		conic-gradient(#ddb357 var(--b2t_progress), rgba(0,255,0,.2) 0%);
}
JavaScript:
// get our button by class
var b2t = document.querySelector('.b2t_btn');


// very simple function to move document to "pos" position.
function moveTo(pos) {
	document.documentElement.scrollTop = pos;
}

// our page scroll event function, this is called on any scroll event
function pageScrollEvent() {
	// get our current scoll offset
	var currentScroll = document.documentElement.scrollTop;

	// only show our b2t button if scroll offset is above 10
	if (currentScroll > 10) {
		b2t.style.display = "flex";
	} else {
		b2t.style.display = "none";
	}

	// get the relative height
	var height = document.documentElement.scrollHeight - document.documentElement.clientHeight;

	// convert scoll offset into a percentage
	var scrolled = (currentScroll / height) * 100;

	// update our custom progress property/variable
	b2t.style.setProperty('--b2t_progress', scrolled + '%');
}


// set the scroll event which calls our scroll event function.
window.onscroll = function() { pageScrollEvent() };Search
Popular articles

Tags
Accident Adoption Albums Algorithms Altcoins Animal Rescue AnL Aquarium Arma ArmA nd Leg Array Partitioning Arrays Assembler Assembly Atanasovsko Award Bazaar Binary Search Bitcoin BMW Bohemia Bootstrap Bulgaria Bulgaria Za Mladite Burgas C C++ car Celerity Charity Chemical Records Chemical Shock Chemlight Code Competition Compiler Contest Converter Covid-19 CPP Crypto Cryptocurrency css Data Recovery Database DataTables Decode Dedicated Dedicated Server Delphi Development Dialogs Divide & Conquer DIY DnB Drum & Bass E30 Earplugs Event Exchange Eyes Fish Floating-point Flood Fog Fracture Frank Harrison Freeware Function Funny Gallery Game Game Development Game Modding Gaming Garden Gardening Gazebo GERB GitHub Glitch Hamish Harding Happy New Year Heapify HeapSort Helga HTML HTML entities Introduction Jackie JavaScript JQuery Jungle Lake Language Linker Listbox ListNBox lnbSetTooltip m52b25 MariaDB Maths Merry Christmas Mini Mining Miningpoolhub Mist Modding MPH Multiplayer Music MySql NGO OceanGate One Nature ORCA organisation OverHertz Paludarium Pandemic Pascal Paul-Henri Nargeolet Paws Furever Pergola Persistence Pets Photography Pier Plugin Programming progress bar Project PX Library Quicksort r53 Racing Replace RIP Scripting Searching Server Shahzada Dawood Simulation Simulator Smoke Snippet Social media Software Sorting Source Sourcecode SQF Statistics Stockton Rush String Strings Submarine Suleman Dawood Terrain Detail Text Titan Tool Tragedy tutorial UCS4Char UE4 unicorn Unreal Engine Victims View Distance ViewBug web Web Development Website Welcome Woodworking Ziron Zynk